Table of Contents
Introduction
Containers are now first-class citizens in any development cycle. It is essential for us to understand how container networking works. This is not only important from the perspective of service communication but also forms an important aspect of infrastructure security.
In this post, we will learn briefly about various networking modes available for Docker containers and deep dive into Host Mode networking.
Key Takeaways
- Containers are integral to modern development, and understanding container networking is crucial for service communication and infrastructure security.
- Docker containers offer various networking modes, including None, Bridge, Host, Overlay, and Underlay.
- The article provides practical examples of running containers in host mode and illustrates how they share network resources with the host.
- Host mode networking is a valuable option for optimizing container network performance and avoiding the overhead of NAT and port mappings. However, it requires careful management to avoid port conflicts.
- Understanding the differences between networking modes and their implications is essential for effectively using containers in your development and deployment workflows.
Overview of Networking Modes
None
None is straightforward in that the container receives a network stack, but lacks an external network interface. It does, however, receive a loopback interface. Both the rkt and Docker container projects provide similar behavior when None or Null networking is used. This mode of container networking has a number of uses including testing containers, staging a container for a later network connection, and being assigned to containers with no need for external communication.
Bridge Mode
A Linux bridge provides a host internal network in which containers on the same host may communicate, but the IP addresses assigned to each container are not accessible from outside the host. Bridge networking leverages iptables for NAT and port mapping, which provide single-host networking. Bridge networking is the default Docker network type (i.e., docker0), where one end of a virtual network interface pair is connected between the bridge and the container.
Here’s an example of the creation flow:
- A bridge is provisioned on the host.
- A namespace for each container is provisioned inside that bridge.
- Containers’ ethX is mapped to private bridge interfaces.
- Iptables with NAT are used to map between each private container and the host’s public interface.
NAT is used to provide communication beyond the host. While bridged networks solve port-conflict problems and provide network isolation to containers running on one host, there’s a performance cost related to using NAT.
Host Mode
In this approach, a newly created container shares its network namespace with the host, providing higher performance — near metal speed — and eliminating the need for NAT; however, it does suffer port conflicts. While the container has access to all of the host’s network interfaces, unless deployed in privilege mode, the container may not reconfigure the host’s network stack.
Host networking is the default type used within Mesos. In other words, if the framework does not specify a network type, a new network namespace will not be associated with the container, but with the host network. Sometimes referred to as native networking, host networking is conceptually simple, making it easier to understand, troubleshoot, and use.
Overlay
Overlays use networking tunnels to deliver communication across hosts. This allows containers to behave as if they are on the same machine by tunneling network subnets from one host to the next; in essence, spanning one network across multiple hosts. Many tunneling technologies exist, such as virtual extensible local area networks (VXLAN).
VXLAN has been the tunneling technology of choice for Docker libnetwork, whose multi-host networking entered as a native capability in the 1.9 release. With the introduction of this capability, Docker chose to leverage HashiCorp’s Serf as the gossip protocol, selected for its efficiency in neighbor table exchange and convergence times.
For those needing support for other tunneling technologies, Flannel may be the way to go. It supports udp, vxlan, host-gw, AWS-vpc, or gce. Each of the cloud provider tunnel types creates routes in the provider’s routing tables, just for your account or virtual private cloud (VPC). The support for public clouds is particularly key for overlay drivers given that among others, overlays best address hybrid cloud use cases and provide scaling and redundancy without having to open public ports.
Multi-host networking requires additional parameters when launching the Docker daemon, as well as a key-value store. Some overlays rely on a distributed key-value store. If you’re doing container orchestration, you’ll already have a distributed key-value store lying around.
Overlays focus on the cross-host communication challenge. Containers on the same host that are connected to two different overlay networks are not able to communicate with each other via the local bridge — they are segmented from one another.
Underlay
Underlay network drivers expose host interfaces (i.e., the physical network interface at eth0) directly to containers or VMs running on the host. Two such underlay drivers are media access control virtual local area network (MACvlan) and internet protocol VLAN (IPvlan). The operation of and the behavior of MACvlan and IPvlan drivers are very familiar to network engineers. Both network drivers are conceptually simpler than bridge networking, remove the need for port-mapping, and are more efficient. Moreover, IPvlan has an L3 mode that resonates well with many network engineers. Given the restrictions — or lack of capabilities — in most public clouds, underlays are particularly useful when you have on-premises workloads, security concerns, traffic priorities, or compliance to deal with, making them ideal for brownfield use. Instead of needing one bridge per VLAN, underlay networking allows for one VLAN per subinterface.
Now let’s focus on host-mode networking.
Understanding Host Mode Networking in Detail
Host mode seems pretty straightforward but there are some items you need to keep in mind when deploying it. Let’s look at an example so you can see what we are talking about. First, let’s start a basic web container on a host.
docker run -d --name=web1 --net=host vaibhavthakur/docker:webinstance1
Note that I’m passing the ‘–net=host’ flag in the docker run command. Also, note that I’m not specifying any port mappings. Once the image is downloaded docker will run the image as a container called ‘web’. Since we told docker to run this container as a daemon let’s connect to a bash shell on the container.
docker exec -it web1 /bin/bash
This should drop you in a shell inside the container and now you should check all the network adapters available to the container. You can do so as shown below.
root@docker-1:~# docker exec -it web1 /bin/bash
[root@docker-1 /]# ifconfig
docker0   Link encap:Ethernet  HWaddr 02:42:9F:DE:3C:3C
          inet addr:172.17.0.1  Bcast:172.17.255.255  Mask:255.255.0.0
          inet6 addr: fe80::42:9fff:fede:3c3c/64 Scope:Link
          UP BROADCAST MULTICAST  MTU:1500  Metric:1
          RX packets:0 errors:0 dropped:0 overruns:0 frame:0
          TX packets:2 errors:0 dropped:0 overruns:0 carrier:0
          collisions:0 txqueuelen:0
          RX bytes:0 (0.0 b)  TX bytes:180 (180.0 b)

ens4      Link encap:Ethernet  HWaddr 42:01:0A:80:0F:E8
          inet addr:10.128.15.232  Bcast:0.0.0.0  Mask:255.255.255.255
          inet6 addr: fe80::4001:aff:fe80:fe8/64 Scope:Link
          UP BROADCAST RUNNING MULTICAST  MTU:1460  Metric:1
          RX packets:99119 errors:0 dropped:0 overruns:0 frame:0
          TX packets:10016 errors:0 dropped:0 overruns:0 carrier:0
          collisions:0 txqueuelen:1000
          RX bytes:236101229 (225.1 MiB)  TX bytes:881725 (861.0 KiB)

lo        Link encap:Local Loopback
          inet addr:127.0.0.1  Mask:255.0.0.0
          inet6 addr: ::1/128 Scope:Host
          UP LOOPBACK RUNNING  MTU:65536  Metric:1
          RX packets:336 errors:0 dropped:0 overruns:0 frame:0
          TX packets:336 errors:0 dropped:0 overruns:0 carrier:0
          collisions:0 txqueuelen:1000
          RX bytes:35505 (34.6 KiB)  TX bytes:35505 (34.6 KiB)
Now, you should exit the container and run the same command on the host.
root@docker-1:~# ifconfig
docker0: flags=4099<UP,BROADCAST,MULTICAST>  mtu 1500
        inet 172.17.0.1  netmask 255.255.0.0  broadcast 172.17.255.255
        inet6 fe80::42:9fff:fede:3c3c  prefixlen 64  scopeid 0x20<link>
        ether 02:42:9f:de:3c:3c  txqueuelen 0  (Ethernet)
        RX packets 0  bytes 0 (0.0 B)
        RX errors 0  dropped 0  overruns 0  frame 0
        TX packets 2  bytes 180 (180.0 B)
        TX errors 0  dropped 0 overruns 0  carrier 0  collisions 0

ens4: flags=4163<UP,BROADCAST,RUNNING,MULTICAST>  mtu 1460
        inet 10.128.15.232  netmask 255.255.255.255  broadcast 0.0.0.0
        inet6 fe80::4001:aff:fe80:fe8  prefixlen 64  scopeid 0x20<link>
        ether 42:01:0a:80:0f:e8  txqueuelen 1000  (Ethernet)
        RX packets 99198  bytes 236116665 (236.1 MB)
        RX errors 0  dropped 0  overruns 0  frame 0
        TX packets 10074  bytes 888616 (888.6 KB)
        TX errors 0  dropped 0 overruns 0  carrier 0  collisions 0

lo: flags=73<UP,LOOPBACK,RUNNING>  mtu 65536
        inet 127.0.0.1  netmask 255.0.0.0
        inet6 ::1  prefixlen 128  scopeid 0x10<host>
        loop  txqueuelen 1000  (Local Loopback)
        RX packets 336  bytes 35505 (35.5 KB)
        RX errors 0  dropped 0  overruns 0  frame 0
        TX packets 336  bytes 35505 (35.5 KB)
        TX errors 0  dropped 0 overruns 0  carrier 0  collisions 0

root@docker-1:~#
It can be seen that the output of the command is exactly the same. This means you should be able to access the container using the host IP. Please keep in mind that a firewall rule to accept on port 80 is enabled on the machine if you are using a cloud provider.
Let’s try to access the service on the instance’s public IP.
We can see the response from the service running inside the web1 container.
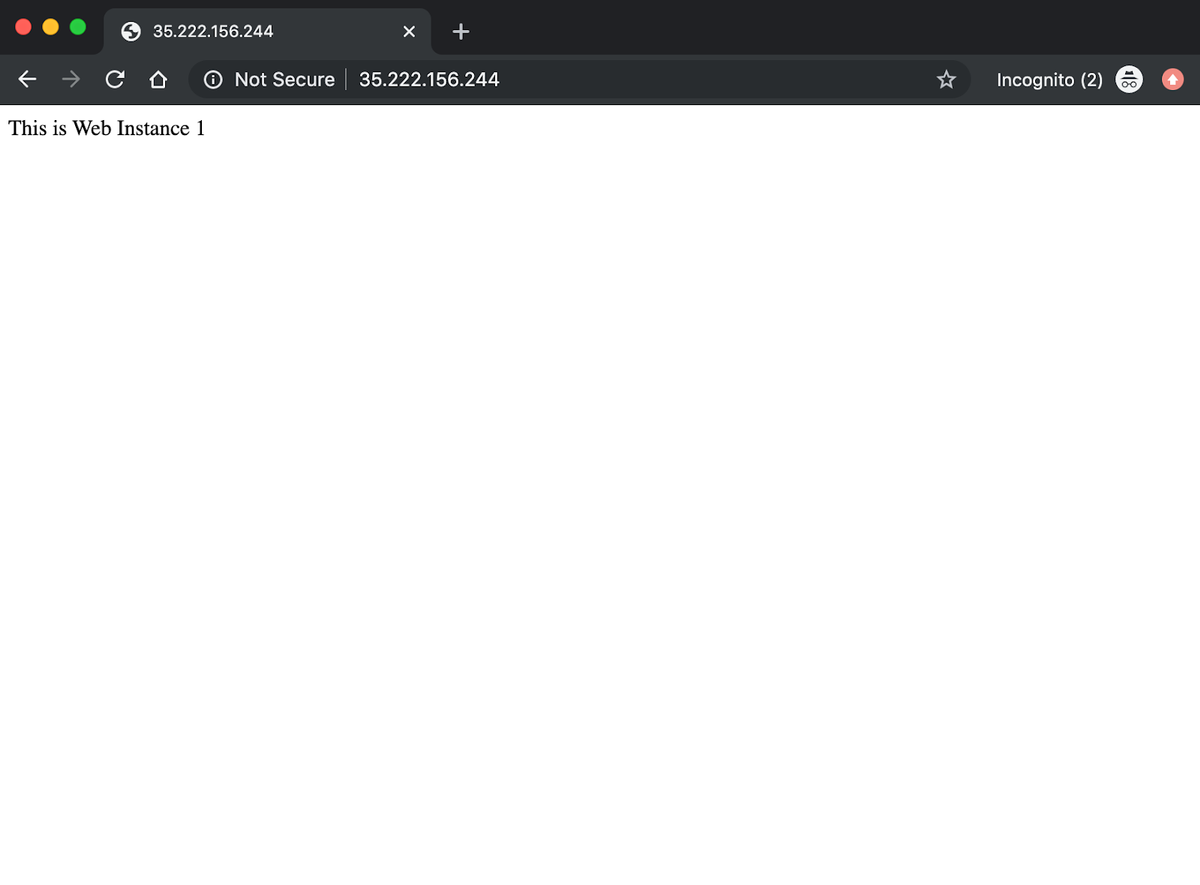
You should note that we did not provide any port mapping while running the container and explicitly specified host node networking and thus can access the Apache server running inside the container on port 80.
Now let’s try another thing. We will try to run another container of the same service using host mode networking on this host and see what happens.
docker run -it --name web2 --net=host vaibhavthakur/docker:webinstance2
If you notice carefully, the container did not even start. Let’s look at the logs.
root@docker-1:~# docker run -it --name web2 --net=host vaibhavthakur/docker:webinstance2
Unable to find image vaibhavthakur/docker:webinstance2' locally
webinstance2: Pulling from vaibhavthakur/docker
Image docker.io/jonlangemak/docker:webinstance2 uses outdated schema1 manifest format. Please upgrade to a schema2 image for better future compatibility. More information at https://docs.docker.com/registry/spec/deprecated-schema-v1/
a3ed95caeb02: Already exists
3a5831f32025: Already exists
1070eeab2b98: Already exists
86ba7b11cc42: Already exists
8ea0f21db18b: Already exists
772c76531fbf: Already exists
04120008298a: Already exists
6a221adc032a: Already exists
4a835ccd3c00: Already exists
78e705e491cf: Already exists
c343940bb393: Already exists
663a5158a2b7: Already exists
09cf647f3fa5: Pull complete
Digest: sha256:62883de5c6d7786ec4267b8a0ccb9b104dea7523c9db934ecb911b78a5d983ee
Status: Downloaded newer image for vaibhavthakur/docker:webinstance2
2019-12-26 04:57:29,606 CRIT Supervisor running as root (no user in config file)
2019-12-26 04:57:29,619 INFO supervisord started with pid 1
2019-12-26 04:57:29,621 INFO spawned: 'httpd' with pid 6
2019-12-26 04:57:29,664 INFO exited: httpd (exit status 1; not expected)
2019-12-26 04:57:29,665 INFO received SIGCLD indicating a child quit
2019-12-26 04:57:30,668 INFO spawned: 'httpd' with pid 7
2019-12-26 04:57:30,707 INFO exited: httpd (exit status 1; not expected)
2019-12-26 04:57:30,707 INFO received SIGCLD indicating a child quit
2019-12-26 04:57:32,711 INFO spawned: 'httpd' with pid 8
2019-12-26 04:57:32,749 INFO exited: httpd (exit status 1; not expected)
2019-12-26 04:57:32,750 INFO received SIGCLD indicating a child quit
2019-12-26 04:57:35,755 INFO spawned: 'httpd' with pid 9
2019-12-26 04:57:35,796 INFO exited: httpd (exit status 1; not expected)
2019-12-26 04:57:35,796 INFO received SIGCLD indicating a child quit
2019-12-26 04:57:36,798 INFO gave up: httpd entered FATAL state, too many start retries too quickly
So, this clearly shows that the container could not come up since the entry point process died quickly. Let's dig a little deeper and get inside the container.
root@docker-1:~# docker exec -it web2 /bin/bash
[root@docker-1 /]# service httpd status
httpd dead but subsys locked
[root@docker-1 /]# service httpd start
Starting httpd: (98)Address already in use: make_sock: could not bind to address [::]:80
(98)Address already in use: make_sock: could not bind to address 0.0.0.0:80
no listening sockets available, shutting down
Unable to open logs
                                                           [FAILED]
We first checked the status of httpd service and it showed dead. Then we tried to start it but it failed again because it could not bind to port 80. Let’s do one more test and check the status of port 80.
[root@docker-1 /]# netstat -plnt
Active Internet connections (only servers)
Proto Recv-Q Send-Q Local Address               Foreign Address             State       PID/Program name
tcp        0      0 127.0.0.53:53               0.0.0.0:*                   LISTEN      -
tcp        0      0 0.0.0.0:22                  0.0.0.0:*                   LISTEN      -
tcp        0      0 :::80                       :::*                        LISTEN      -
tcp        0      0 :::22                       :::*                        LISTEN      -
[root@docker-1 /]#
It can be clearly seen that port 80 is occupied by some processes, and this process is our container named web1. Therefore, it is safe to conclude that the web2 container tried to bind to port 80 on the same host on which web1 is running, and thus it failed. Now, let’s kill the web1 container and try to start the httpd service in the web2 container.
After killing web1, we tried to start httpd on web2 and it was successful.
[root@docker-1 /]# service httpd start
Starting httpd:                                            [  OK  ]
[root@docker-1 /]#
One final test, let’s access the instance on port 80.
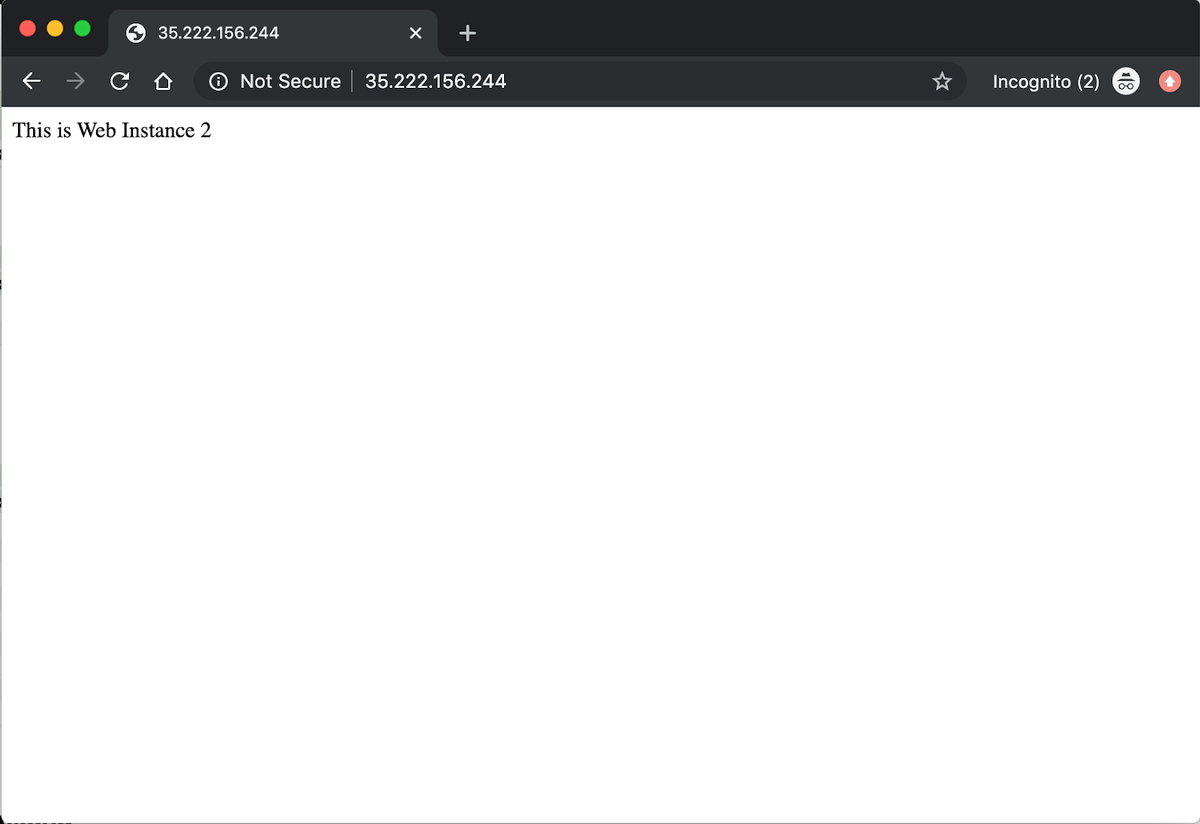
We can see the response from the service running inside the web2 container.
Conclusion
It is important to understand that host mode networking provides better network performance for containers since the network traffic need not traverse the docker0 bridge and iptables port mappings. I hope this article clearly explains what host mode networking is and how it is different from other networking options. Feel free to reach out should you have any questions about it.
If you're looking to monitor your containers, sign up for a free trial here, or book a demo and talk to us directly. If you're looking to learn more check out our three-part series on Docker Networking, featuring a deep dive into many kinds of Docker networking.

