
Table of Contents
Great systems are not just built. They are monitored.
MetricFire runs Graphite and Grafana as a fully managed service for growing engineering teams, taking care of storage, scaling, and version updates so your team doesn't have to. Plans start at $19/month, billed per metric namespace rather than per host, and include engineer-staffed support. Integrations work natively with Heroku, AWS, Azure, and GCP, and data is stored with 3× redundancy in SOC2- and ISO:27001-certified data centres.
Introduction
In the first part of this series, we developed a Python API using Flask and containerized it with Docker, setting up a development environment using Docker Compose.
In this second instalment, we will delve into deploying the same application to a production environment using Kubernetes, specifically on Google Kubernetes Engine (GKE). This guide will walk you through storing environment variables securely, creating a GKE cluster, configuring Google Container Registry (GCR), and deploying your application to Kubernetes.
Key Takeaways
- Docker Compose is a way to manage multi-container applications. The article explains how to use Docker Compose to set environment variables and manage containers.
- The tutorial covers creating a Google Kubernetes Engine (GKE) cluster, a managed Kubernetes service on Google Cloud. It provides steps for setting up the Google Cloud environment and creating a Kubernetes cluster using the command line.
- The article describes using Google Container Registry (GCR) to store Docker images. It guides readers through configuring Docker to use GCR credentials and pushing Docker images to GCR.
- It explains how to deploy containers to Kubernetes, including creating Pods and Deployments. Kubernetes manifest files define the desired state of the application, and kubectl commands are used for deployment.
- The article introduces Kubernetes Services with LoadBalancers to make services accessible from outside the cluster. It explains creating a service that maps external ports to Pods, allowing external access to the deployed application.
1. Storing Environment Variables in Docker Compose
Managing environment variables is crucial for configuring applications across different environments. Docker Compose allows you to define environment variables in a .env file, which can then be referenced in your docker-compose.yml file.
If you go back to our code, you will notice that the API key is hard-coded, which is a bad practice in general and especially a bad security practice.
One of the solutions is storing this variable as an environment variable:
import os
API_KEY = os.environ['API_KEY']
Docker allows us to assign a value to API_KEY when we run a container:
docker run -dit --rm  -p 5000:5000 --name weather -e
API_KEY="4a6e07d289e10d710761fae2288b3b69" weather:v1
Let's test this. This is our final code:
from flask import Flask
import requests
import os
app = Flask(__name__)
API_KEY = os.environ['API_KEY']

@app.route('/')
def index():
    return 'App Works!'

@app.route('/<string:city>/<string:country>/')
def weather_by_city(country, city):
    url = 'https://samples.openweathermap.org/data/2.5/weather'
    params = dict(
        q=city + "," + country,
        appid= API_KEY,
    )
    response = requests.get(url=url, params=params)
    data = response.json()
    return data

if __name__ == '__main__':
    app.run(host="0.0.0.0", port=5000)
You should start by stopping the containers that use port 5000 before proceeding. Then you need to rebuild the image, and run it using:
docker stop weather
docker build -t weather:v1 .
 docker run -dit --rm  -p 5000:5000 --name weather -e API_KEY="4a6e07d289e10d710761fae2288b3b69" weather:v1
When using Docker Compose, you should adapt your "docker-compose.yaml" file to use environment variables:
version: '3.6'
services:
  weather:
    build: .
    ports:
      -"5000:5000"
    environment:
      -API_KEY=${API_KEY}
    volumes:
      -.:/app
Don't forget to export API_KEY as an environment variable before running Docker Compose:
export API_KEY="4a6e07d289e10d710761fae2288b3b69"
docker-compose up -d
Another way of setting environment variables is by creating a file where we store all of the variables.
Create a file named ".env" and add the "API_KEY":
API_KEY="4a6e07d289e10d710761fae2288b3b69"
Now run the container using:
docker run -dit --rm -p 5000:5000 --name weather --env-file .env weather:v1
If you want to use Docker Compose, change your "docker-compose.yaml" file to use the ".env" file:
version: '3.6'
services:
  weather:
    build: .
    ports:
      -"5000:5000"
    env_file:
      -$PWD/.env
    volumes:
      -.:/app
Note that we can create other environment variables like this for debug, port, IP, etc.
2. Creating a GKE Cluster
After exploring the Docker and Docker Compose concepts, let's move to the Kubernetes part. We will use Google Kubernetes Engine, which is Google Cloud's managed Kubernetes service.
Before creating any Kubernetes cluster, make sure to create a Google Cloud account, an organization, and a project. If you are testing GCP for the first time, the free tier can benefit you.
After installing the CLI of Google Cloud, let's start by setting the default configurations:
gcloud init
To communicate with Kubernetes API and manage the Kubernetes cluster, we will also need Kubectl. If it's not installed yet, you can follow the official documentation to install it. We can create a cluster using the web console or the CLI:
gcloud container clusters create mycluster --num-nodes 3 --region europe-west1
Change the region and the cluster name according to your preferences. Once the cluster is created, you will be able to use kubectl to connect to:
kubectl config get-contexts
If you see "mycluster" in the list, proceed using the following command:
kubectl config set-context <cluser_id>
Note that you can get the list of GCP zones using gcloud compute zones list.
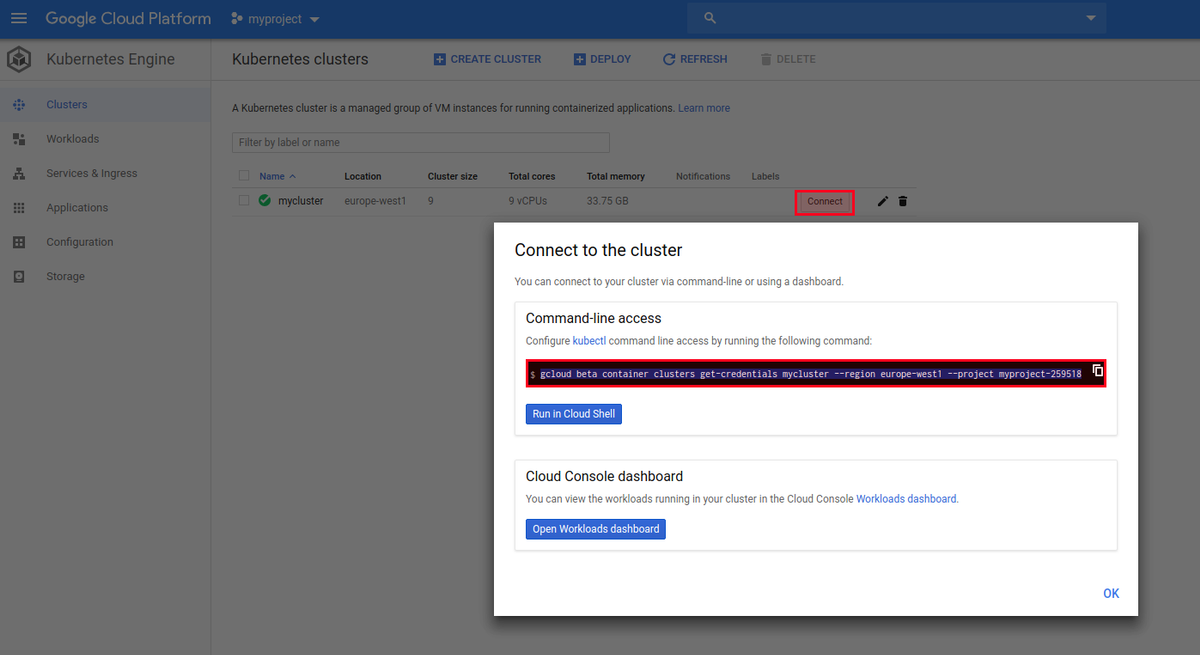
You can also copy the gcloud command line that allows you to connect to the cluster from the web console.
When you are connected to the cluster, you can connect to its API using kubectl. You can, for example, check the running services:
kubectl get svc
You should see the default Kubernetes ClusterIP service:
NAME         TYPE        CLUSTER-IP    EXTERNAL-IP   PORT(S)   AGE
kubernetes   ClusterIP   10.35.240.1   <none>        443/TCP   34m
The ClusterIP is the default Kubernetes service and it exposes the Kubernetes service on an internal cluster IP.
3. Configuring and Using Google Container Registry
The next step in this tutorial is to build and push the API image to a registry. We are going to use Google Cloud's (GCR) managed container registry. We may have chosen Dockerhub, Gitlab Registry, or our own self-hosted registry.
Start by downloading "docker-credential-gcr":
gcloud components install docker-credential-gcr
Configure Docker to use your Container Registry credentials:
docker-credential-gcr configure-docker
Now, let's build and push the API image:
docker build -t gcr.io/myproject-259511/weather:v1 .
docker push gcr.io/myproject-259511/weather:v1 .
Make sure to change "myproject-259511" to your project name. You can also change "gcr.io" to "us.gcr.io", "eu.gcr.io", or "asia.gcr.io" according to your location.
4. Deploying the Application to Kubernetes
To run a container in Kubernetes, you should initially create a pod. A pod is essentially a group of one or more containers with shared storage/network resources. Unlike Docker, in Kubernetes, the smallest deployment unit is the pod, not the container.
We can create Kubernetes objects, and particularly pods, using Kubernetes manifest files:
apiVersion: v1
kind: Pod
metadata:
  name: api
  labels:
    app: api
spec:
  containers:
    -name: api
      image: gcr.io/myproject-259518/weather:v1
      ports:
        -name: api-port
          containerPort: 5000
          protocol: TCP
You should save this to a YAML file and execute kubectl create -f <your_file> to deploy the pod. However, the best way to develop pods is by creating a deployment object that will delegate the pod creation to a replica set.
In other words, a deployment file is a declarative update for pods and replica sets. The purpose of the replica set is to maintain a stable set of replicated pods and ensure the availability of a specified number of pods.
Let's move to the practical part and create a deployment file. This is a basic deployment file:
apiVersion: apps/v1
kind: Deployment
metadata:
  labels:
    app: api
  name: api
spec:
  replicas: 1
  selector:
    matchLabels:
      app: api
  template:
    metadata:
      labels:
        app: api
    spec:
      containers:
      -image: gcr.io/myproject-259518/weather:v1
        name: api
        ports:
        -containerPort: 5000
          name: http
        env:
        -name: API_KEY
          value: "4a6e07d289e10d710761fae2288b3b69"
In the above YAML file, we declare the kind of object we are creating: a deployment. We also describe the containers we want to run inside the Pod. In our example, we are running a single container.
The container configuration includes its name, image, exposed port, protocol, and environment variables.
Save the YAML code to api.yaml file and execute the following command to apply these changes:
kubectl apply -f api.yaml
We can check the running Pod using kubectl get pods:
NAME                   READY   STATUS    RESTARTS   AGE
api-7f94844c45-mcgsv   1/1     Running   0          4m45s
At this stage, the container is deployed, we can scale it by either changing the YAML file and increasing the "replicas" size or by using Kubectl:
kubectl scale deployment api --replicas=2
The container(s) can be accessible inside the cluster, but until now, there has been no way to access it from outside the cluster. We should create a service if we want to create a public service and expose our API to Internet users.
This is the service YAML description:
apiVersion: v1
kind: Service
metadata:
  name: api
  labels:
    app: api
spec:
  type: LoadBalancer
  ports:
  -port: 80
    targetPort: 5000
  selector:
    app: api
Using GKE, when a service is a load balancer, Google Cloud will create a VM that acts as a load balancer and map an external port to a POD. In the above example, we used the load balancer's port 80 and assigned it to API port 5000.
This is the complete "api.yaml" file:
apiVersion: apps/v1
kind: Deployment
metadata:
  labels:
    app: api
  name: api
spec:
  replicas: 1
  selector:
    matchLabels:
      app: api
  template:
    metadata:
      labels:
        app: api
    spec:
      containers:
      -image: gcr.io/myproject-259518/weather:v1
        name: api
        ports:
        -containerPort: 5000
          name: http
        env:
        -name: API_KEY
          value: "4a6e07d289e10d710761fae2288b3b69"
---
apiVersion: v1
kind: Service
metadata:
  name: api
  labels:
    app: api
spec:
  type: LoadBalancer
  ports:
  -port: 80
    targetPort: 5000
  selector:
    app: api
You should be able to see the public IP address of the load balancer by using kubectl get svc:
NAME         TYPE           CLUSTER-IP      EXTERNAL-IP     PORT(S)        AGE
api          LoadBalancer   10.35.242.171   34.77.193.210   80:31629/TCP   4m32s
kubernetes   ClusterIP      10.35.240.1     <none>          443/TCP        79m
If you visit the external IP address of the load balancer, you will be able to query our API:
curl http://34.77.193.210/london/uk/
{
   "base":"stations",
   "clouds":{
      "all":90
   },
   "cod":200,
   "coord":{
      "lat":51.51,
      "lon":-0.13
   },
   "dt":1485789600,
   "id":2643743,
   "main":{
      "humidity":81,
      "pressure":1012,
      "temp":280.32,
      "temp_max":281.15,
      "temp_min":279.15
   },
   "name":"London",
   "sys":{
      "country":"GB",
      "id":5091,
      "message":0.0103,
      "sunrise":1485762037,
      "sunset":1485794875,
      "type":1
   },
   "visibility":10000,
   "weather":[
      {
         "description":"light intensity drizzle",
         "icon":"09d",
         "id":300,
         "main":"Drizzle"
      }
   ],
   "wind":{
      "deg":80,
      "speed":4.1
   }
}
You can shut down the cluster using gcloud container clusters delete <cluster_name> --region <your_region>.
Conclusion
By following this guide, you've successfully transitioned a Python API from a local development environment to a scalable, production-ready deployment on Kubernetes using GKE. This process involved managing environment variables securely, creating a Kubernetes cluster, configuring a container registry, and deploying your application using Kubernetes manifests. Embracing these practices ensures that your applications are portable, scalable, and maintainable across different environments.
In this tutorial, we used different technologies from the Docker ecosystem to build, run, and manage an API in different environments. At the end of the tutorial, we could scale and distribute traffic to our service using a load balancer.
There are many interesting concepts about Docker and Kubernetes; networking is probably the most complex to understand if you are starting your journey. You should also check out some of our Docker and Kubernetes guides for further study.
If you're interested in seeing how MetricFire can fit into your monitoring environment, try our free trial and start deploying metrics within minutes. Feel free to book a demo and talk to us directly about monitoring solutions that work for you.


