
Table of Contents
Great systems are not just built. They are monitored.
MetricFire runs Graphite and Grafana as a fully managed service for growing engineering teams, taking care of storage, scaling, and version updates so your team doesn't have to. Plans start at $19/month, billed per metric namespace rather than per host, and include engineer-staffed support. Integrations work natively with Heroku, AWS, Azure, and GCP, and data is stored with 3× redundancy in SOC2- and ISO:27001-certified data centres.
Introduction
This is part 1 of our three-part Kubernetes CI/CD series. Previously we have covered important topics like Highly Available Monitoring set-up for Kubernetes, Logging set-up, secrets management and much more. However, an important aspect of Kubernetes workflow is managing how we release new versions of the application, ensuring high availability of the application and safe rollbacks if needed.
Today we will learn about these aspects and then we'll deep dive into them in the upcoming posts. But first, let's understand some fundamentals of CI/CD.
Continuous Integration (CI)
CI stands for continuous integration. Developers practicing continuous integration merge their changes back to the main branch as often as possible. The developer's changes are validated by creating a build and running automated tests against the build. By doing so, you avoid the integration hell that usually happens when people wait for release day to merge their changes into the release branch.
Continuous integration puts a great emphasis on testing automation to check that the application is not broken whenever new commits are integrated into the main branch.
Continuous Delivery (CD)
Continuous delivery is an extension of continuous integration to make sure that you can release new changes to your customers quickly in a sustainable way. This means that on top of having automated your testing, you also have automated your release process and you can deploy your application at any point of time by clicking on a button.
In theory, with continuous delivery, you can decide to release daily, weekly, fortnightly, or whatever suits your business requirements. However, if you truly want to get the benefits of continuous delivery, you should deploy to production as early as possible to make sure that you release small batches that are easy to troubleshoot in case of a problem.
Continuous Deployment (CD)
Continuous deployment goes one step further than continuous delivery. With this practice, every change that passes all stages of your production pipeline is released to your customers. There's no human intervention, and only a failed test will prevent a new change from being deployed to production.
Continuous deployment is an excellent way to accelerate the feedback loop with your customers and take pressure off the team as there isn't a Release Day anymore. Developers can focus on building software, and they see their work go live minutes after they've finished working on it.
In this blog we'll focus on Continuous Integration and Continuous Delivery.

Kubernetes Resource Templating
A Kubernetes application can consist of multiple objects such as Deployment, Daemonset, Cronjob, Configmap, Secret, Services, Ingress etc. Deploying each one of them separately could be an arduous task and more so when the application needs to be deployed to more than one Kubernetes cluster. We can use one of the following templating tools to manage this:
Helm
It is a tool for managing Charts. Charts are packages of pre-configured Kubernetes resources. Use Helm to:
- Find and use popular software packaged as Helm Charts so they can be run in Kubernetes
- Share your own applications as Helm Charts
- Create reproducible builds of your Kubernetes applications
- Intelligently manage your Kubernetes manifest files
- Manage releases of Helm packages
Helm is a tool that streamlines installing and managing Kubernetes applications. Think of it like apt, yum, or homebrew for Kubernetes.
- Helm renders your templates and communicates with the Kubernetes API
- Helm runs on your laptop, CI/CD platform, or wherever you want it to run
- Charts are Helm packages that contain at least two things:
1. A description of the package (Chart.yaml)
2. One or more templates, which contain Kubernetes manifest files - Charts can be stored on disk, or fetched from remote chart repositories (like Debian or Red Hat packages)
Additionally, Helm allows you to test helm charts, template helm charts and even perform atomic installs in order to make sure that the application is never degraded.
Kustomize
Kustomize is a tool designed to let users customize raw, template-free YAML files for multiple purposes, leaving the original YAML untouched and usable as-is. Users can run Kustomize directly, or starting with Kubernetes 1.14 use kubectl -k to access the Kustomize functionality. Note: the standalone Kustomize binary is newer than the functionality built into kubectl as of the Kubernetes 1.15 release.
In its simplest form/usage, Kustomize is a set of resources. These resources would be YAML files that define Kubernetes objects like Deployments or Services, plus a set of instructions on the changes to be made to these resources. Similar to the way Make leverages a file named Makefile to define its function, or the way Docker uses a Dockerfile to build a container, Kustomize uses a file named Kustomization.yaml to store the instructions on the changes the user wants made to a set of resources.
Continuous Integration Guidelines
The process of CI starts as soon as we check new code into version control. Some popular continuous integration tools are:
- CircleCI
- TravisCI
- Jenkins
- SemaphoreCI
- GitlabCI
Depending upon which branch is being built, all or some of the following CI pipeline stages should be followed:
- Build Docker Image: In this stage we build the docker image which will get deployed using our helm chart. The Dockerfile for the application is usually checked into the source control root. We highly recommend using multistage builds to ease the build process. Check out some strategies to build optimal docker images here.
- Test Docker Image: Once you have built the docker image it needs to be tested. We can use a docker-compose file to spin up services during the CI process and test our docker image.
- Check for Vulnerabilities: It is important to make sure that the image we have built is free from all vulnerabilities. One way to do this is to introduce some vulnerabilities in our image depending upon the packages baked in. Vulnerability scan is also available in the image registries such as GCR and ECR but we highly recommend performing vulnerability scan during the CI process (even before pushing the image to the registry). This can be achieved using tools like trivy.
- Push Docker Image: Now that we have built, tested and scanned the docker image, it is time to push the image to the registry. Before pushing the image to the registry, we should make sure that the image is tagged properly. The Image tag can correspond to the git sha or release version. In most cases, an image is also tagged depending on the env it will be deployed to. Please keep in mind that we should never tag the image as Latest. It is very bad practice.
- Build Helm Chart: As soon as we have a successful push for the docker image (correctly tagged) which should be deployed, we should update the helm chart to use that particular image. Once that is done, it is important to perform some basic testing using the helm test command. We can also check the format using helm lint command. Along with the image tag it is highly recommended to update release information in the helm chart. It is always considered a good practice using different values.yaml files for each environment to which the application should be deployed to, for example values.prod.yaml for production and values.stag.yaml for staging. The default values can be maintained in the original values.yaml.
- Package Helm Chart: Once the helm chart is updated with the latest release information and tested, we are ready to deploy it. In order to do that we should package it using the helm package command.
- Add Helm Chart to Helm Repo: A tested and packaged helm chart can be added to a helm repo or any object storage such as GCS or S3 where it will be consumed by the Continuous Delivery system.
- Notifications: Proper notifications should be configured for the CI builds, which could be represented as either Slack notifications or Github Statuses. In more complex scenarios we should set notifications for each stage of the Continuous Integration pipeline, and we should set at least failure notifications if not also success indicators for each stage.
Continuous Delivery Guidelines
The handoff from the Continuous Integration (CI) to Continuous Delivery (CD) is very important. This handoff occurs as soon as we push our helm chart to the helm repo or object storage. Some popular continuous delivery tools are:
- Jenkins
- Spinnaker
- Harness
If you plan to go with a GitOps oriented pipeline then the following could be suitable:
- WeaveFlux
- ArgoCD
Deployment strategies can be broadly classified into the following:
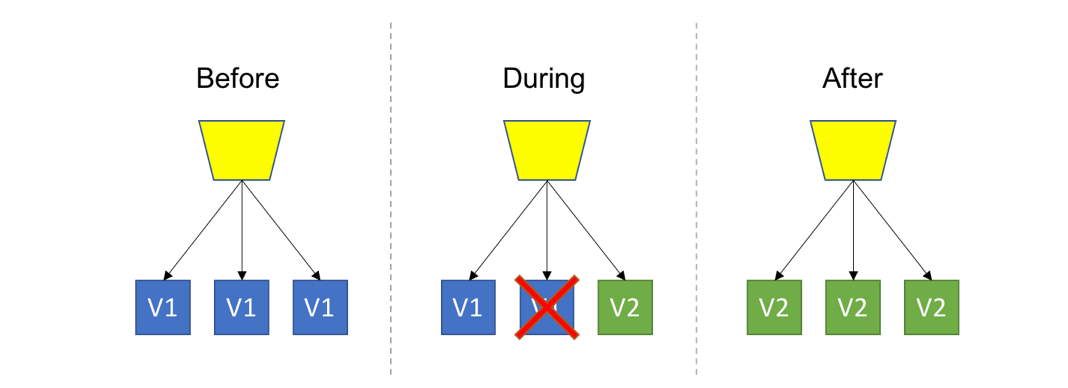
- Rolling Upgrade: Introduce a new version of the code into the existing deployment, gradually ramping up while decommissioning old code.
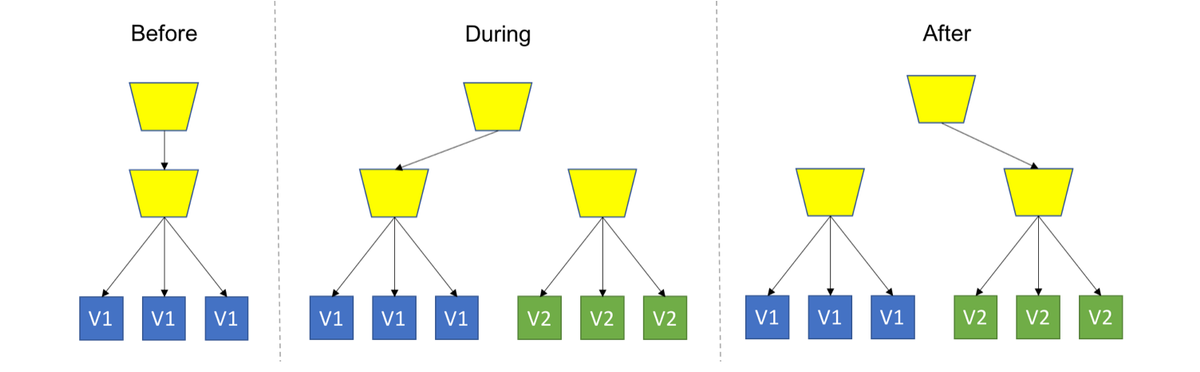
- Blue/Green Deployment: Spin up a new separate deployment for the new version, without affecting the current one. Test the new version, and once ready start routing users to the new version.
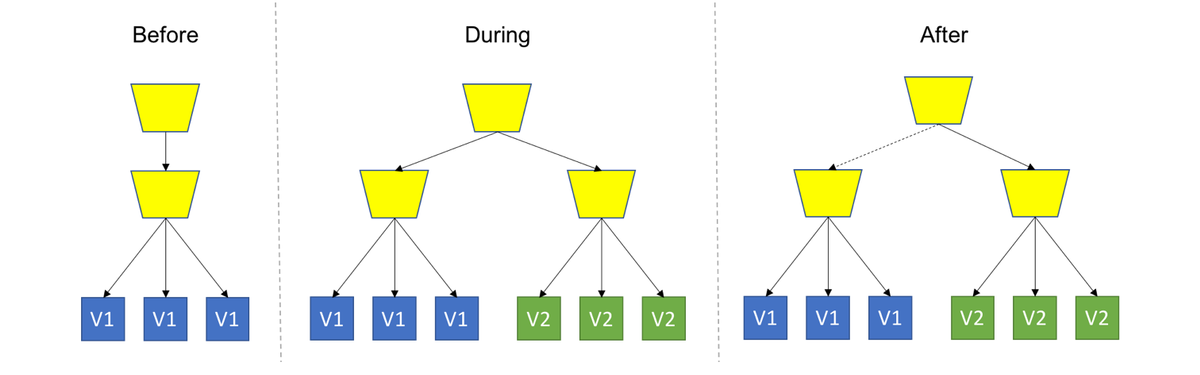
- Canary Deployment: Deploy the new version into production alongside the old one, carefully controlling who gets to use the new version. Monitor and tune the experiment while gradually expanding its population.
Kubernetes natively supports the Rolling Upgrades method, but with the help of appropriate Continuous Delivery tools we can implement each of the strategies described above.
Now, let's go over a few stages for a continuous delivery pipeline. This is specific to a deployment which is made to the production environment but a similar pattern could be followed in case of dev environment or staging environment deploys.
- Retrieve Artifact: This CD process starts as soon as the final CI stage pushes a packaged helm chart to the helm repo or object storage. The very first stage here is to retrieve the artifact from the helm repo. We should make sure that appropriate auth credentials are configured for our CD tool in order to do so.
- Deploy to Staging Environment: Once we have the helm chart pulled from the helm repo we should first deploy to a staging environment. This ensures that anything which is being deployed to Production is already running internally.
- Wait for Stakeholder Approval: As soon as staging deployment is successful we should notify all the stakeholders about it and wait for their approval to promote the staging version to production. This approval process can be aided by providing the Stakeholder with some application metrics and test results. This approval is considered important because it assures us that there is someone guarding the application deployment to production. It is at least necessary for Mission Critical apps.
- Deploy to Production Environment: After Stakeholder approval it is time to promote the build to production environment. We should ensure that before any deploys are made to the production cluster, we already have proper Monitoring and Logging in place for it. Also, our deployments should be atomic and support automatic rollbacks. Not only that, they should enable the continuous delivery tool to provide complete insight into our workloads. Spinnaker does this very efficiently but more on that in the upcoming blogs.
- Notifications: Delivery pipelines can be long with multiple stages. While the Release and Operations teams closely monitor them all the time it is important to send over notifications for successful and failed deploys. The best way to do this is to post Slack Messages directly to the stakeholders. We should ensure that the slack message is comprehensive enough to contain Errors and Hyperlinks to tools/dashboards for debugging purposes.
Conclusion
CI/CD is an essential aspect of any DevOps toolchain and it is very important to get it right. However, before delving into it, you should make sure that there is enough visibility in the infrastructures so that issues can be noticed and resolved real time. To ensure that you should have proper monitoring and logging in place already. You can read more about monitoring Kubernetes applications here, and get a production ready monitoring set up with MetricFire in our free trial here. You can also book a demo with the MetricFire team, and talk to us directly about how to set up monitoring for your Kubernetes CI/CD pipeline.
We hope that this post provided you with some guidelines around Continuous Integration and Continuous Delivery strategies for Kubernetes applications. It can be a little overwhelming to configure all of these and get it right for the very first time. Therefore, we will be coming out with in-depth implementations for each of these stages for CI and CD in the upcoming posts of this series.

