
Table of Contents
Great systems are not just built. They are monitored.
MetricFire runs Graphite and Grafana as a fully managed service for growing engineering teams, taking care of storage, scaling, and version updates so your team doesn't have to. Plans start at $19/month, billed per metric namespace rather than per host, and include engineer-staffed support. Integrations work natively with Heroku, AWS, Azure, and GCP, and data is stored with 3× redundancy in SOC2- and ISO:27001-certified data centres.

Introduction
Docker images are the basic deployable artifact for various container orchestrators. It is extremely important to understand what is needed by the application to run and to only include those things in the Docker image. This ensures that the container image is extremely light and portable but also reduces the surface of attack for any potential attacker. In this article, we'll go in-depth on strategies to reduce the Docker image size.
If you're looking to monitor your Docker containers, check out MetricFire. MetricFire runs hosted Graphite, and Grafana so that engineers can focus on optimizing their software, rather than running monitoring systems. Check out the MetricFire free trial to see if MetricFire fits into your monitoring stack.
Key Takeaways
- To optimize Docker images, it's crucial to include only what's necessary for the application to run. This minimizes image size and reduces the potential attack surface for security.
- Docker images are built using layers, and optimizing the structure of instructions in your Dockerfile can significantly reduce the number of layers, making images smaller and more efficient.
- Multi-stage builds allow you to separate build and preparation phases from the runtime environment, resulting in smaller, more efficient images by discarding unnecessary artifacts.
- By following the strategies in this article, and integrating tools like 'dive' into your CI/CD pipeline, you can create more efficient and smaller Docker images, improving resource utilization and deployment speed.
Strategies to Build Optimal Docker Images
Caching Considerations
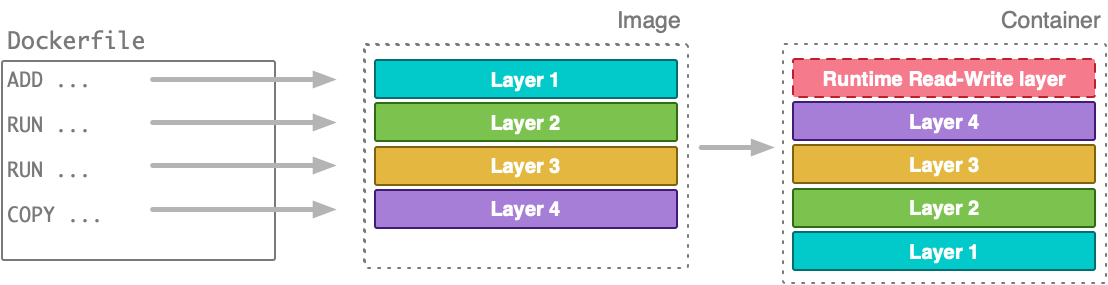
A Docker image describes the instructions for running a container. Each of these instructions, contained in the Dockerfile, creates a layer. The set of these layers is useful to speed up the build operations and the image transfer. This saves a lot of disk space when many images share the same layers.
FROM debian:stable

WORKDIR /var/www

RUN apt-get update
RUN apt-get -y --no-install-recommends install curl
RUN apt-get -y --no-install-recommends install ca-certificates

RUN curl https://raw.githubusercontent.com/gadiener/docker-images-size-benchmark/master/main.go -o main.go

RUN apt-get purge -y curl
RUN apt-get purge -y ca-certificates
RUN apt-get autoremove -y
RUN apt-get clean
RUN rm -rf /var/lib/apt/lists/*
The Dockerfile above creates an image with 10 layers. However, if we structure these statements carefully we can drastically reduce the image size. For instance, the same Dockerfile above can be re-written as follows:
FROM debian:stable

WORKDIR /var/www

RUN apt-get update && \
    apt-get -y --no-install-recommends install curl \
        ca-certificates && \
    curl https://raw.githubusercontent.com/gadiener/docker-images-size-benchmark/master/main.go -o main.go && \
    apt-get purge -y curl \
        ca-certificates && \
    apt-get autoremove -y && \
    apt-get clean && \
    rm -rf /var/lib/apt/lists/*
Now we are achieving the same result with just 2 layers. As you can see the last commands used are apt-get autoremove and apt-get clean. It’s very important to delete temporary files that do not serve the purpose of the image, such as the package manager’s cache. These files increase the size of the final image without giving any advantage. In Alpine OS, you can use apk --no-cache add <package> when installing a package to bypass the use of the cache.
Multi-Stage Builds
Multi-stage builds were the center of attention back when Docker 17.05 became available. A long-awaited feature, a multi-stage build allows image builders to leave custom image build scripts behind and integrate everything into the well-known Dockerfile format.
In high-level terms, you can think of a multi-stage build as merging multiple Dockerfiles, or simply a Dockerfile with multiple FROMs.
Before multi-stage builds, if you wanted to build the artifact of your project and distribute it in a container using a Dockerfile, you probably had to follow a build process ending up with a container like the one depicted below:
Although there is nothing technically wrong with the above process, the final image and the resulting container are bloated with layers created while building/preparing the project artifact that is not necessary for the project’s runtime environment.
Multi-stage builds allow you to separate the creation/preparation phases from the runtime environment:

You can still have a single Dockerfile to define your complete build workflow. However, you can copy artifacts from one stage to another while discarding the data in layers you don’t need.
Note: Multi-stage builds allow you to create cross-platform, repeatable builds without using OS-specific, custom-built scripts. The final size of your image can be kept to a minimum by selectively including artifacts generated in previous phases of your build.
Below is an example of multi-stage Dockerfile:
FROM golang:1.10.4 as build

RUN CGO_ENABLED=0 GOOS=linux go get -v github.com/lyft/ratelimit/src/service_cmd

FROM alpine:3.8 AS final
WORKDIR /ratelimit/config

RUN apk --no-cache add ca-certificates
COPY --from=build /go/bin/service_cmd /usr/local/bin/ratelimit
It can be seen that the ratelimiter binary is built inside the Golang-based environment and then used in an alpine environment.
Optimal Base Image
A base image forms the very first layer of the final Docker image. It is extremely important to choose an optimal base image.
As noted in the Docker documentation:
“The FROM instruction initializes a new build stage and sets the Base Image for subsequent instructions. As such, a valid Dockerfile must start with a FROM instruction. The image can be any valid image — it is especially easy to start by pulling an image from the Public Repositories.”
There are a ton of different base images to choose from, each one with its perks and features. Choosing an image that provides just enough of the tools and the environment you need for your application to run is of paramount importance when it comes to the final size of your own Docker image.
The size of different popular base images varies considerably, as you’d expect:
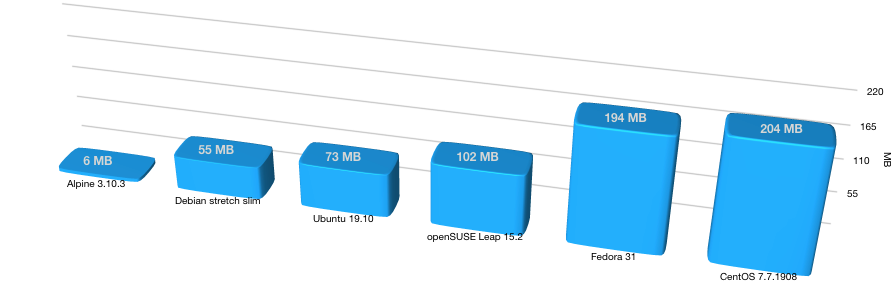
Effectively, containerizing your application using an Ubuntu 19.10 base image will add a minimum of 73 MB, whereas the same application using an Alpine 3.10.3 base image will only increase the size by an extra 6 MB. As Docker caches image layers, the download/bandwidth penalty is applicable only the first time you’re about to start a container with that image (or simply, when pulling the image). However, the increased size is still there.
The guys behind Alpine Linux haven’t discovered a special secret sauce that Ubuntu or Debian guys are still looking for. To be able to create a Docker image an order of magnitude smaller than (for instance) Debian, they had to make some decisions regarding what to include and what not to include in their Alpine image. Before choosing Alpine as your default base image, you should check if it provides all the environment you need. Also, even though Alpine comes with a package manager, you may find that a specific package or package version you’re using in your (for instance) Ubuntu-based development environment isn’t available in Alpine. These are tradeoffs you should be aware of and test before you choose the most appropriate base image for your project.
Finally, if you need to use one of the fatter base images, you could use an image minimization tool, such as the free and open-source DockerSlim, to reduce the size of your final image.
Note: Choosing an appropriate base image for your image is important when trying to keep the size down. Evaluate your options and choose an image that provides the tools you need for the size you can afford.
Using .dockerignore
When you run the docker build command the first output line is:
Sending build context to Docker daemon 2.048kB
Step 1/9 : FROM ...
To build a new image the Docker daemon needs to access the files needed to create the image. So, every time you run the docker build command, the Docker CLI packs all build context files into a tar archive and sends it to the daemon.
The Docker build command can accept an already created tar archive or the URL of a Git repository.
This causes an expensive waste of time, as well as an increase in the size of the final image. As we know, the size and the build time of an image in a microservices continuous delivery flow are critical.
You can define the Docker build context you need using the .dockerignore file. This has a syntax like the .gitignore file used by the Git tool. It looks something like this:
.env
.editorconfig
.git
.github
.cache
*.md
LICENSE
Makefile
vendor/
It can also be useful to avoid exposing secrets such as a .env file, all the Git history, or any other sensitive data. A common pattern is to inject all the service’s codebase into an image with an instruction like this:
COPY . /var/www
This way, we’re copying the entire build context into the image and, of course, we’re creating a new cache layer. So, if any of those files change, the layer will be invalidated.
Files that are frequently updated in the build context (logs, cache files, Git history, etc.) will regenerate the layer for every Docker build. You must avoid adding these files to the context. If you still need these files, put them on a layer at the end of the file, this way you’ll avoid invalidating other subsequent layers.
Proper Inspection
Once we create a Docker image we should always inspect the Docker image to check each layer and check how optimized the image is. Using the Docker history command is one such way. For example:
$ docker history cfssl/cfssl
IMAGE               CREATED             CREATED BY                                        SIZE                COMMENT
fb08fbb7bb6d        15 months ago       /bin/sh -c #(nop)  CMD ["--help"]                 0B
<missing>           15 months ago       /bin/sh -c #(nop)  ENTRYPOINT ["cfssl"]           0B
<missing>           15 months ago       /bin/sh -c #(nop)  EXPOSE 8888                    0B
<missing>           15 months ago       /bin/sh -c go get github.com/cloudflare/cfss...   280MB
<missing>           15 months ago       /bin/sh -c #(nop) COPY dir:a17f6a12df322554f...   20.6MB
<missing>           15 months ago       /bin/sh -c #(nop) WORKDIR /go/src/github.com...   0B
<missing>           15 months ago       /bin/sh -c #(nop)  ENV USER=root                  0B
<missing>           2 years ago         /bin/sh -c #(nop) COPY file:ea7c9f4702f94a0d...   2.48kB
<missing>           2 years ago         /bin/sh -c #(nop) WORKDIR /go                     0B
<missing>           2 years ago         /bin/sh -c mkdir -p "$GOPATH/src" "$GOPATH/b...   0B
<missing>           2 years ago         /bin/sh -c #(nop)  ENV PATH=/go/bin:/usr/loc...   0B
<missing>           2 years ago         /bin/sh -c #(nop)  ENV GOPATH=/go                 0B
<missing>           2 years ago         /bin/sh -c set -eux;   dpkgArch="$(dpkg --pr...   298MB
<missing>           2 years ago         /bin/sh -c #(nop)  ENV GOLANG_VERSION=1.9.2       0B
<missing>           2 years ago         /bin/sh -c apt-get update && apt-get install...   162MB
<missing>           2 years ago         /bin/sh -c apt-get update && apt-get install...   142MB
<missing>           2 years ago         /bin/sh -c set -ex;  if ! command -v gpg > /...   7.8MB
<missing>           2 years ago         /bin/sh -c apt-get update && apt-get install...   23.8MB
<missing>           2 years ago         /bin/sh -c #(nop)  CMD ["bash"]                   0B
<missing>           2 years ago         /bin/sh -c #(nop) ADD file:eb2519421c9794ccc...   100MB
Along with that, there is a very handy utility called Dive. It is a tool for exploring a Docker image, and its layer contents, and for discovering ways to shrink the size of your Docker/OCI image. It can be used as shown below:
$ CI=true dive cfssl/cfssl
  Using default CI config
Image Source: docker://cfssl/cfssl
Fetching image... (this can take a while for large images)
Analyzing image...
  efficiency: 99.3689 %

  wastedBytes: 8163967 bytes (8.2 MB)

  userWastedPercent: 0.8748 %

Inefficient Files:
Count  Wasted Space  File Path
    5        4.1 MB  /var/cache/debconf/templates.dat
    3        2.4 MB  /var/cache/debconf/templates.dat-old
    5        607 kB  /var/lib/dpkg/status
    5        606 kB  /var/lib/dpkg/status-old
    4        148 kB  /var/log/dpkg.log
    5         83 kB  /var/cache/debconf/config.dat
    4         74 kB  /var/log/apt/term.log
    5         52 kB  /etc/ld.so.cache
    5         36 kB  /var/log/apt/eipp.log.xz
    5         36 kB  /var/lib/apt/extended_states
    4         31 kB  /var/cache/ldconfig/aux-cache
    3         29 kB  /var/cache/debconf/config.dat-old
    4         12 kB  /var/log/apt/history.log
    3        4.8 kB  /var/log/alternatives.log
    2         903 B  /etc/group
    2         892 B  /etc/group-
    2         756 B  /etc/gshadow
    2         322 B  /var/lib/dpkg/triggers/File
    5           0 B  /var/lib/dpkg/lock
    5           0 B  /var/lib/apt/lists
    2           0 B  /var/lib/dpkg/triggers/Unincorp
    5           0 B  /var/lib/dpkg/updates
    4           0 B  /var/cache/apt/archives/lock
    5           0 B  /var/cache/debconf/passwords.dat
    4           0 B  /var/cache/apt/archives/partial
    2           0 B  /etc/.pwd.lock
    7           0 B  /tmp
    5           0 B  /var/lib/dpkg/triggers/Lock
Results:
  PASS: highestUserWastedPercent
  SKIP: highestWastedBytes: rule disabled
  PASS: lowestEfficiency
Result:PASS [Total:3] [Passed:2] [Failed:0] [Warn:0] [Skipped:1]
Conclusion
We hope this blog helps you and that you can use some of these strategies to optimize your Docker images. We also hope you can integrate tools like Dive into your CI flow to get an insight into the build process. Feel free to reach out to me, Vaibhav, should you have any questions.
As well, if you're getting ready to monitor with Graphite or Grafana, get on to the MetricFire free trial and start visualizing metrics right away. MetricFire runs a hosted version of these open-source projects so you don't have to do any of the heavy lifting. Book a demo with MetricFire, and talk with us directly about how MetricFire can contribute to monitoring at your company.


