
Table of Contents
Great systems are not just built. They are monitored.
MetricFire runs Graphite and Grafana as a fully managed service for growing engineering teams, taking care of storage, scaling, and version updates so your team doesn't have to. Plans start at $19/month, billed per metric namespace rather than per host, and include engineer-staffed support. Integrations work natively with Heroku, AWS, Azure, and GCP, and data is stored with 3× redundancy in SOC2- and ISO:27001-certified data centres.
Introduction
When enterprises run online services, web servers play an essential role. They allow the software to surface on the World Wide Web and make it accessible through web browsers for customers worldwide. When the performance of a web server gets degraded or, even worse, if a web server is entirely down, it impacts the business's bottom line and the brand image for not providing reliable service to customers. Failure to manage web servers can also lead to security risks. Because of these severe consequences, companies heavily invest in monitoring their web servers.
Nginx is one of the most widely used software for web servers. In this article, we will learn the best way to monitor Nginx.
Before we start, check MetricFire. Metricfire provides comprehensive monitoring solutions with Hosted Graphite. You can set up various metrics to monitor Windows with minimal configuration. If you want to learn more about it, please book a demo with us or sign up for the free trial today.
Key Takeaways
- Web servers are critical for online businesses, and their performance directly affects customer experience and brand image. Neglecting web server monitoring can lead to performance issues and security risks.
- Nginx is versatile open-source software used for web servicing, reverse proxying, caching, load balancing, and more. It has evolved to effectively handle diverse online activities.
- Visualizing metrics data is crucial for understanding server performance. Grafana is a recommended open-source tool for creating customizable dashboards.
- Web server monitoring, especially with Nginx, is essential for maintaining optimal performance and ensuring a positive user experience.
What is Nginx?
Nginx is open-source software that enables running web services for online businesses. Its primary use case is web servicing, but it is designed to serve other purposes such as reverse proxying, caching, load balancing, media streaming, and more. Nginx can also work as a proxy server for IMAP, POP3, and SMTP. The initial version of the software supported simple HTML pages. However, as people use web services not only for web browsing but also for doing various activities such as watching, shopping, streaming, and more, Nginx has evolved to handle many different needs.
Key Nginx monitoring metrics
Nginx can power your online business to serve individual and enterprise customers. When there is a problem with the server software, the quality of your service gets degraded. This can lead to a negative ripple effect on your business. To prevent such an event, users want to ensure the software runs optimally using comprehensive monitoring metrics. In this section, let’s learn key Nginx monitoring metrics.
Requests per second
A web server needs to handle user requests, but if your server receives many requests quickly, your server's performance can deteriorate. Requests per second, or RPS, typically tracks the request count within one to five minutes. This measurement purely counts the requests without considering the size of each. By monitoring RPS, you can understand the optimal level of request count that a server can process.
Uptime
When a server gets stressed, it can eventually go down and cannot serve a single request. This is one of the most critical metrics since it can significantly impact serviceability. Uptime refers to how long a server is operating. 100% uptime is where people want to be. Cloud service providers aim to provide 99.9% or higher uptime. You will want to check that server if the uptime number goes below 99.9%.
Error rates
An error rate is calculated by factoring in the percentage of requests that fail. Occasionally, you may see a 502 bad gateway Nginx error, for example. Nginx bad gateways are common website errors, but you can monitor them by using MetricFire. Monitoring error rates can allow operation teams to evaluate the performance of each server efficiently and prioritize optimization. You can consider setting up an alert triggered when an error rate exceeds a certain percentage.
Concurrent request count
A concurrent request count shows how many requests are being handled simultaneously. These metrics also help people understand the server load. Normally, when a server receives multiple requests at the same time, while some are being handled, the rest become on hold. This, however, can lead to a timeout for the waiting requests. When you have too many concurrent requests, it can cause broad failures.
Hardware resource metrics
In addition to the server metrics, you must monitor hardware resources such as memory usage, CPU capacity, storage space, and more. Server software runs on server hardware; thus, if the server lacks memory space, for example, it cannot serve requests fast enough. To operate the server software, operation teams need to check for any spike in resource usage or abnormal activities in this space.
How You Can Configure Nginx with Telegraf and Graphite
You can monitor these metrics using Telegraf and Graphite. To enable this feature, you must first install Telegraf and send metrics data to Graphite. Let’s find out how we can install Telegraf.
Install Telegraf
If you use Windows, run the following commands in Powershell.
wget https://dl.influxdata.com/telegraf/releases/telegraf-1.24.2_windows_amd64.zip -UseBasicParsing -OutFile telegraf-1.24.2_windows_amd64.zip
Expand-Archive .\telegraf-1.24.2_windows_amd64.zip -DestinationPath 'C:\Program Files\InfluxData\telegraf'
The download file above is the latest stable version as of November 2022. If you want to find the later version, check the Telegraf download page.
If you use macOS, you can run the command below.
brew update
brew install telegraf
You can download it on Linux using the command.
wget https://dl.influxdata.com/telegraf/releases/telegraf-1.24.2_linux_amd64.tar.gz
tar xf telegraf-1.24.2_linux_amd64.tar.gz
After you install Telegraf, configure Telegraf to send syslog to Graphite.
Create a configuration file.
Creating a configuration file differs depending on your operating system.
- Windows: run ./telegraf.exe --output-filter graphite config > telegraf.conf
- MacOS: find the configuration file at /usr/local/etc/telegraf/telegraf.conf
- Linux: Find the configuration file at /etc/telegraf/telegraf.conf
Modify config to send metrics to Hosted Graphite.
The primary mechanism for sending metrics to Graphite is via TCP protocol. To send metrics, you must change config variables according to your settings within the configuration file you created or found. A sample configuration looks like the one below.
## This is the configuration for Graphite server to send metrics to
[[outputs.graphite]]
  ## TCP endpoint for your graphite instance.
  ## If multiple endpoints are configured, the output will be load balanced.
  ## Only one of the endpoints will be written to with each iteration.
  ## You can put your hosted graphite endpoint URL
  servers = ["carbon.hostedgraphite.com:2003"]
  ## Metrics prefix name
  prefix = "YOUR_API_KEY.telegraf"
  ## Graphite output template
  ## https://github.com/influxdata/telegraf/blob/master/docs/DATA_FORMATS_OUTPUT.md
  template = "host.tags.measurement.field"

  ## Graphite templates patterns
  ## 1. Template for cpu
  ## 2. Template for disk*
  ## 3. Default template
  # templates = [
  #  "cpu tags.measurement.host.field",
  #  "disk* measurement.field",
  #  "host.measurement.tags.field"
  #]

  ## Enable Graphite tags support
  # graphite_tag_support = false

  ## Metric name and field separating character for Graphite tag
  # graphite_separator = "."

  ## timeout in seconds for the write connection to Graphite
  timeout = 2

  ## Optional TLS Config
  # tls_ca = "/etc/telegraf/ca.pem"
  # tls_cert = "/etc/telegraf/cert.pem"
  # tls_key = "/etc/telegraf/key.pem"

  ## Use TLS but skip chain & host verification
  # insecure_skip_verify = false
Among the configuration above, you need to check the three areas mainly:
- [[outputs.graphite]]
- The server URL in the servers list field: carbon.hostedgraphite.com:2003
- Put your prefix following the pattern of "YOUR_API_KEY.telegraf".
Save the configuration file after changing the values. Next, you need to restart the Telegraf service to apply the changes.
Launch Telegraf
Finally, you need to launch Telegraf to apply the changes. The starting command differs from the operating system.
Windows
./telegraf.exe -service install -config 'C:\Program Files\telegraf\telegraf.conf'
net start telegraf
MacOS
brew services restart telegraf
brew services restart telegraf
Linux
sudo service telegraf startor
sudo systemctl start telegraf
When Telegraf sends out data, it can decide the output data format following your configuration.
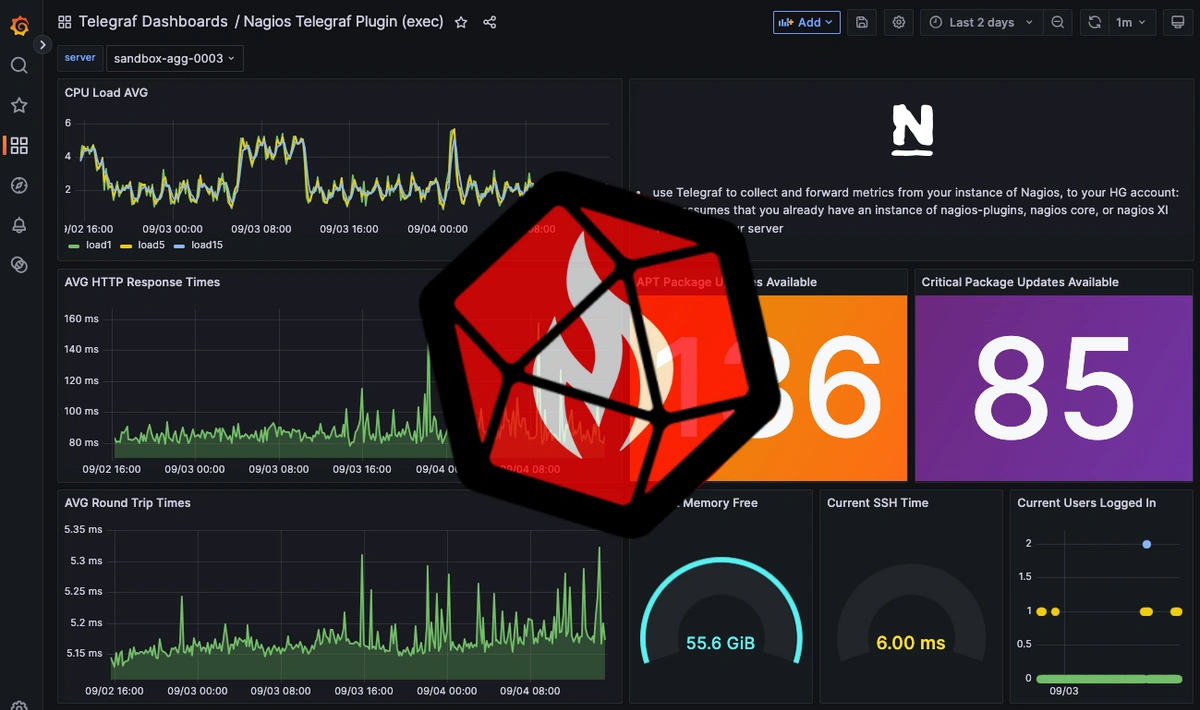
Creating a dashboard to monitor NGINX metrics
After you set up Nginx and Graphite, the next important step is creating a dashboard to monitor the metrics data from the server software efficiently. When you interpret data, visualization is an essential component since we can comprehend pictures much faster. One of the best ways to visualize Graphite data is by utilizing Grafana. Grafana is an open-source monitoring tool that allows you to download data from different sources and visualize it on beautiful, customizable dashboards. After creating the Grafana dashboard, you need to add information panels. There are various types of panels in Grafana that you can use for different purposes.
Monitoring Nginx with MetricFire
MetricFire provides both Hosted Graphite and hosted dashboards as a single software product. It does all the necessary work to install, configure, and maintain these monitoring tools. With MetricFire, you can have Hosted Graphite dashboards and many third-party service integrations, all hosted within a web application, saving you a lot of time and money. There is also an option to install other customized plugins. MetricFire works transparently and lets you view its internal system metrics on an open public page. It gives you control over your data. You can access and export your data at any time. For more details, check out our other tutorial here.
Conclusion
We learned the concept of Nginx and how to monitor Nginx using Telegraf and Graphite. Graphite is an excellent open-source tool, but using and maintaining open-source software can be demanding. MetricFire provides hosted Graphite for users so that people can focus on what matters most and delegate maintenance jobs.
Try MetricFire for free and enjoy all the benefits of using a hosted service for half the competitors' price! Book a demo with the MetricFire team and ask any questions about the operation of our system.